
Why Your AI Anime Prompt Doesn't Produce What You Want—and How to Fix It
You’ve spent twenty minutes crafting the perfect prompt. You describe the character’s hair color, eye shape, clothing, pose, and even the lighting. You hit generate. And then… the AI ignores half of what you asked for.
The hair is the wrong color. The outfit has missing details. The character’s face keeps changing between generations. Or worst of all, you add more descriptive words to fix it, and the image gets worse instead of better.
If this happens to you regularly, you’re not alone. This is one of the most frustrating parts of AI anime generation, and it reveals something important: the problem isn’t your creativity. It’s that you’re treating prompt writing like traditional text-based instructions. AI image generation doesn’t work that way.
The good news? These problems are predictable, and they’re fixable.
Quick Answer: Why Your AI Anime Prompt Is Not Working
AI anime prompts fail for specific, addressable reasons. Understanding them changes everything.
Vague or conflicting descriptions are the primary culprit. Saying “beautiful long hair” might work, but “beautiful long flowing hair with slight waves and a soft color” creates competing instructions that the model doesn’t know how to balance. Different words carry different visual weight, and sometimes they contradict each other.
Model bias plays a huge role too. Some anime checkpoints are trained on specific art styles, so they naturally favor certain color palettes, facial proportions, and clothing types. If you choose a model that’s biased toward realistic anime but you want chibi style, no amount of prompt tweaking will fix it.
LoRA conflicts and missing trigger words often go unnoticed. LoRAs (Low-Rank Adaptations) are specialized modifiers that enhance specific styles or concepts, but they only work when you know their trigger words. Use the wrong weight, or forget the trigger word entirely, and the LoRA does nothing.
Text limitations in AI models mean that AI doesn’t process prompts word-by-word the way humans do. Each word has diminishing importance as your prompt gets longer. After a certain point, adding more description actively confuses the model rather than improving the result.
Missing or misaligned reference images also cause failures. Character consistency across generations requires either a strong reference image or a model specifically trained for consistency—and even then, the AI can’t guarantee a perfect copy.
These aren’t problems with your prompts. They’re limitations of the tools. Once you understand them, you can work around them.
Common Prompt Problems in AI Anime Art
Let’s look at the specific failures you encounter most often.
Wrong hair color happens when your description uses competing color modifiers. Saying “dark blue hair with silver streaks and a slight purple tint” gives the model three color instructions at once. It picks one and ignores the others, or blends them into something you didn’t expect.
Wrong eye color or shape often occurs because anime eye styles vary dramatically between models and training data. Some models default to large, luminous eyes; others favor smaller, more realistic proportions. A prompt that works beautifully in one model might produce completely different results in another.
Missing clothing details or wrong outfit entirely is a classic frustration. You describe “a black jacket over a white shirt with silver buttons” and the AI generates a black jacket over nothing, or adds embellishments you didn’t ask for. This happens because clothing descriptions compete with each other in the model’s attention.
Accessories disappearing is incredibly common. Requesting “wearing glasses and holding a sword” often results in one or both missing entirely. The model struggles to reliably generate multiple specific objects, especially smaller details like accessories.
Wrong pose or orientation occurs when your pose description conflicts with the model’s default behaviors. Asking for “sitting on a chair facing left” when the model’s training data shows most anime characters facing forward creates a conflict.
Inconsistent character face across multiple generations is perhaps the most aggravating problem. Without a reference image, the AI has no anchor for what your character should look like, so every new image is a different interpretation.
The image looks good, but ignores your prompt happens when the model prioritizes aesthetic quality over accuracy. This is actually the model working as designed—it’s been trained to produce visually appealing images first, prompt accuracy second.
Why Adding More Words Doesn’t Fix the Prompt
This is where most people go wrong.
Your first instinct when a prompt fails is to add more words. Add more adjectives. Be more specific. Write longer descriptions. Logically, this should help. But it actually makes things worse.
Here’s why: AI image models don’t read your prompt like a human editor reads an instruction manual. Instead, they convert each word into embeddings—mathematical representations of meaning—and then weigh each word’s importance. The model essentially asks: “Which parts of this prompt are most important to the final image?”
Early words carry more weight than later words. Important descriptors carry more weight than modifiers. Specific concepts carry more weight than vague adjectives. But here’s the critical part: after a certain point, additional words don’t clarify your intent. They dilute it.
When you write a 50-word prompt instead of a 15-word prompt, you’re not doubling your descriptive power. You’re spreading your model’s attention across more competing instructions. The model has to choose which ideas to prioritize, and longer prompts often bury your most important requests under layers of secondary details.
Think of it like a conversation. If you ask someone “Can you make a sandwich?” they understand. If you say “Can you make a sandwich with bread, but not too much bread, and the bread should be soft but not too soft, and I want it on a plate but only if the plate is clean, but only if the plate matches the tablecloth,” you’ve confused them. More words created more ambiguity, not more clarity.
Additionally, longer prompts often contain conflicting instructions. You might say “dark hair with a subtle blue tint but natural-looking” without realizing that “dark” and “blue tint” and “natural-looking” are visually competing ideas. The model gets confused about which instruction takes priority.
This is why reference images work better than longer prompts. A single image shows the model exactly what you want without conflicting text descriptions. Similarly, simpler, more focused prompts almost always outperform complex, detailed ones.
How Model Choice Changes Prompt Accuracy
You might think all anime models create similar results, just with slightly different art styles. That’s only half true.
Different anime checkpoints aren’t just “the same model with different aesthetics.” They’re trained on different datasets, optimized for different purposes, and have different built-in biases about anatomy, facial features, clothing, and composition.
Model A might be trained primarily on popular anime screenshots, so it defaults to large, expressive eyes and exaggerated proportions. Model B might be trained on digital anime art that leans more realistic, resulting in smaller eyes and more naturalistic anatomy. Model C might specialize in chibi or super-deformed styles.
This means the exact same prompt produces three different interpretations based on which model you choose. If you’re getting consistent results that don’t match your description, the model might simply be biased against what you’re asking for.
Model choice also affects prompt accuracy in subtler ways:
Lighting behavior: Some models default to warm, soft lighting; others favor cool tones or high contrast.
Composition: Certain models prefer close-up character shots; others favor full-body or environmental context.
Facial proportions: Eye size, face shape, and feature placement vary dramatically between models.
This is why PixAI‘s ability to compare multiple models in quick succession matters. Instead of wasting time tweaking a prompt for a model that’s biased against your vision, you can generate the same prompt across three different checkpoints and see which one is closer to what you want. Once you find the right model, your prompt accuracy improves immediately.
How LoRA Weight and Trigger Words Affect Results
LoRAs are specialized AI modules that enhance or modify specific aspects of your image. They might focus on a particular art style, character type, clothing aesthetic, or visual effect. But they only work if you use them correctly.
Each LoRA has a trigger word—a specific phrase that activates the module. Without the trigger word, the LoRA does nothing, even if it’s enabled. You could have the perfect LoRA loaded but miss the trigger word and waste time wondering why your results haven’t improved.
LoRA weight determines how strongly the LoRA influences the image. A weight of 0.5 applies the LoRA subtly; a weight of 1.0 applies it at full strength. But there’s a catch: different LoRAs have different optimal weights.
A weight that’s too low means the LoRA barely affects the output. Your desired style or effect barely appears.
A weight that’s too high can overpower other parts of your prompt or create exaggerated, unrealistic results.
Common mistakes include:
Forgetting the trigger word entirely, then wondering why the LoRA isn’t working.
Loading multiple conflicting LoRAs (like a “realistic anime” LoRA and a “chibi” LoRA simultaneously) and being confused when the results look weird.
Using a high LoRA weight on top of a long, detailed prompt, which creates too many competing instructions.
Using the same LoRA weight for every LoRA, when different ones need different weights to look right.
PixAI’s interface makes these adjustments transparent. You can see the trigger word, adjust the weight with a slider, and preview how changes affect your output. Understanding these controls transforms LoRA from a mysterious feature into a powerful tool.
When Reference Images Work Better Than Longer Prompts
This is one of the most powerful techniques in AI anime generation, but it’s often overlooked by beginners.
A reference image—either a photo, artwork, or previous AI generation—gives the model concrete visual information instead of relying on text interpretation. For certain use cases, this is invaluable.
Character consistency is the primary reason to use references. If you’re generating multiple images of an original character (OC) and want the face to stay consistent across generations, a reference image is essential. No amount of prompt description can lock in specific facial features the way a reference image can.
VTubers and digital persona design benefit tremendously from reference images. You can generate outfit variations, pose variations, and expression variations while maintaining the same core character identity.
Specific outfits are easier to control with a reference. Instead of describing “a black Victorian gothic dress with lace sleeves and a corset,” you can show the model an image of the exact outfit and say “this outfit, but on a different character” or “this outfit, different pose.”
Specific poses and angles are more reliable with references. Describing a pose in text is surprisingly difficult. Showing it is instant.
Specific facial features like a unique eye shape, nose structure, or expression are nearly impossible to lock in with text alone. A reference image anchors these details.
However, important caveat: reference images don’t guarantee perfect consistency. The AI will interpret your reference through the lens of your prompt, the selected model, and the LoRAs you’re using. You might get 85% consistency instead of 100%. But that’s still vastly better than 40% consistency from text description alone.
PixAI’s reference image workflow lets you upload an image and blend it into your generation process. You control how much influence the reference has, which prevents the AI from simply copying the reference and ignoring your prompt entirely.
A Practical PixAI Troubleshooting Workflow
Instead of randomly tweaking your prompt and hoping something works, follow this step-by-step process.
Step 1: Write a focused prompt. Remove adjectives that don’t directly describe the character or scene. Replace “beautiful, stunning, gorgeous” with specific visual markers like “soft lighting” or “warm color palette.” Aim for 15–25 words, maximum.
Step 2: Generate your first result. Take note of what works and what fails. Don’t regenerate immediately. Analyze what the model actually produced.
Step 3: Identify the exact failure. Don’t just say “it’s wrong.” Pinpoint the specific problem. Is the hair color wrong? Is the clothing missing details? Is the face inconsistent? Naming the specific failure guides your next adjustment.
Step 4: Simplify your prompt. Remove the descriptors that failed. If the hair color was wrong, remove competing color modifiers. If the outfit had too many details, reduce it to essentials. Simplification often works better than elaboration.
Step 5: Try another model. Generate the same simplified prompt using a different anime checkpoint. Don’t assume your first model is the right one. Model comparison takes 30 seconds and often reveals that a different checkpoint handles your prompt far better.
Step 6: Adjust LoRA settings if applicable. If you’re using LoRAs, check that you have the correct trigger words and that your weights are reasonable (typically 0.6–0.9 for most applications). Conflicting or misconfigured LoRAs often explain mysterious failures.
Step 7: Double-check trigger words. Search PixAI’s LoRA documentation or the original LoRA description to confirm you’re using the correct trigger words. A missing trigger word is invisible—the LoRA silently does nothing.
Step 8: Introduce a reference image. If you’re still struggling with character consistency or specific details, add a reference image. Upload it to PixAI and adjust the reference weight to balance between your prompt description and the reference image.
Step 9: Edit instead of regenerating. Before generating a new image, consider whether editing the existing one is faster. PixAI’s editing tools let you paint or refine specific areas of your image without regenerating from scratch. This preserves the parts that work while fixing isolated problems.
Step 10: Compare results side-by-side. Once you’ve made adjustments, generate multiple variations using your refined settings. Compare them directly to find the best version. This comparison process teaches you which settings and prompts actually work for your style preferences.
This workflow removes guesswork. Instead of hoping your next attempt is better, you’re systematically testing and evaluating each variable.
Before & After Examples
Real examples show how these principles work in practice.
Example 1: Hair Color Conflict
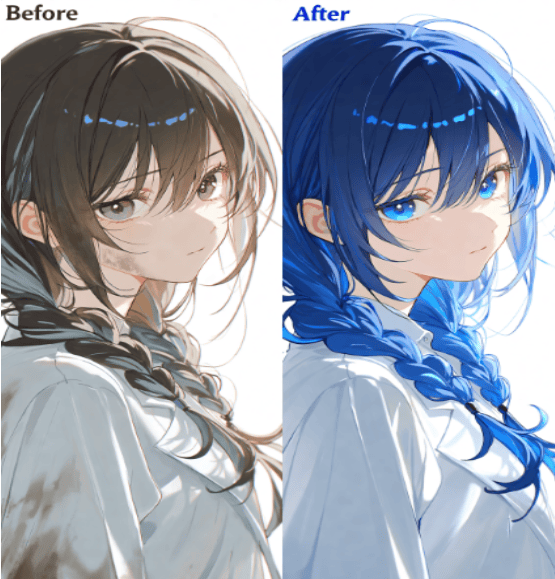
Problem: Hair rendered as muddy brown instead of vibrant blue.
Original Prompt: “Anime girl with long blue hair with natural gradient and subtle silver streaks and soft sheen”
What Went Wrong: “Natural gradient” and “silver streaks” and “soft sheen” created competing instructions. The model prioritized naturalism and muted the blue.
What Changed: Simplified to “Anime girl with long vibrant blue hair” and switched from a realistic-anime model to a more stylized anime checkpoint.
Why It Worked: Fewer competing descriptors and a model with stronger color emphasis.
Improved Result: Vibrant blue hair with the saturation and visual impact you intended.
Example 2: Missing Outfit Details
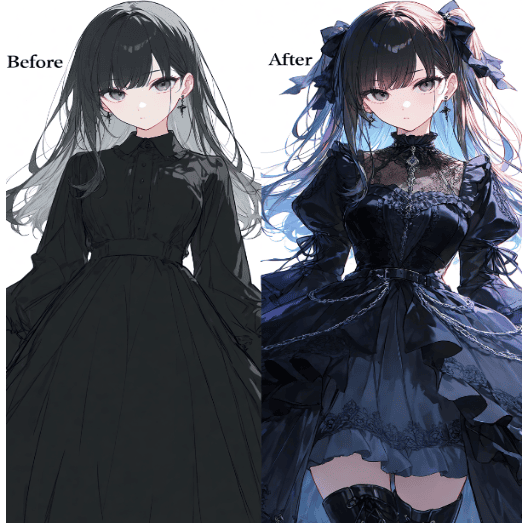
Problem: Clothing was too simple; requested details disappeared.
Original Prompt: “Girl wearing black and white gothic lolita dress with lace trim, black thigh-high boots, and silver chains”
What Went Wrong: Too many specific clothing elements competing for attention. The model prioritized the dress but dropped boots and chains.
What Changed: Used a reference image of a gothic lolita dress and simplified the prompt to “Girl wearing gothic lolita dress with the outfit from the reference image.”
Why It Worked: Reference images anchor specific visual details better than text description alone.
Improved Result: All outfit elements present and accurate, with proper styling and proportions.
Example 3: LoRA Weight Mismatch
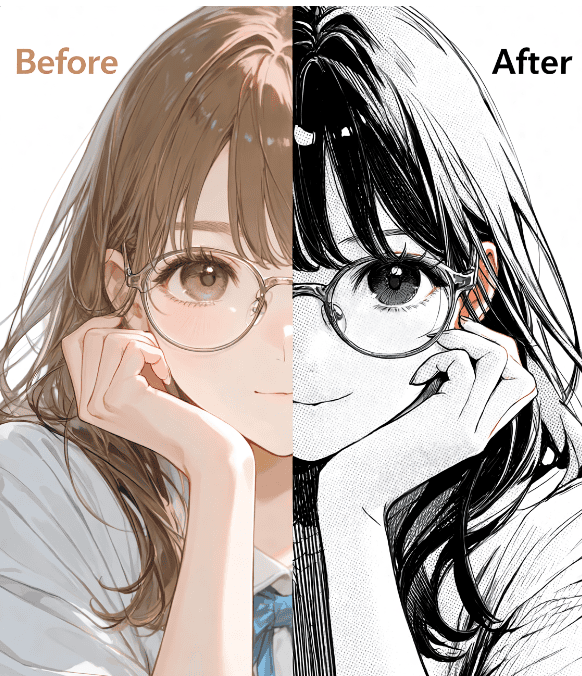
Problem: Character art style was too subtle; LoRA seemed to have no effect.
Original Prompt: “Anime girl with round glasses” using a “Manga Style” LoRA with weight set to 0.3
What Went Wrong: The LoRA trigger word was present, but the weight of 0.3 was too low to make a visible impact.
What Changed: Increased LoRA weight to 0.8 and kept everything else identical.
Why It Worked: The “Manga Style” LoRA needed higher weight to override the base model’s tendencies.
Improved Result: Art style shifted noticeably to manga aesthetic with heavier inking and bolder line work.
Prompt Troubleshooting Checklist
Before regenerating, work through this checklist:
☐ Prompt clarity: Does your prompt describe essentials only? (15–25 words ideal)
☐ Color conflicts: Are you using competing color modifiers? (e.g., “dark” and “vibrant” for the same element)
☐ Model choice: Have you tested this prompt on at least two different anime models?
☐ LoRA trigger words: If using LoRAs, are the trigger words correct and present?
☐ LoRA weight: Is the weight reasonable (0.6–0.9), or is it too low/high?
☐ Conflicting LoRAs: Are you running multiple LoRAs that contradict each other?
☐ Reference image: Would a reference image lock in the details you’re struggling with?
☐ Editing option: Can you edit the existing image instead of regenerating?
☐ Model bias: Is the model biased against what you’re asking for? Test a different checkpoint.
Final Thoughts
AI anime generation isn’t a guessing game. Your prompts fail for specific, predictable reasons—and those reasons have practical solutions.
The most important realization is this: writing longer prompts doesn’t improve results. Choosing the right model does. Adjusting LoRA settings correctly does. Using reference images strategically does. Understanding what your model is actually trained to produce does.
When you troubleshoot systematically instead of randomly tweaking, you stop fighting the AI. You start working with it.
PixAI’s troubleshooting workflow—rapid model comparison, visible LoRA controls, reference image options, and direct editing—makes this process accessible. But the principles work anywhere: simplify your prompt, test multiple models, understand LoRA configuration, use references for consistency, and edit strategically.
Start with your next generation. Identify the specific failure, not just “it’s wrong.” Adjust one variable at a time. Compare results. You’ll be surprised how quickly your consistency improves.
For a deeper dive into these concepts, check out the PixAI Beginner Guide or the Model vs LoRA Guide.